第7回:アプリ開発:センサの活用方法
第7回の講義では、スマートフォンに搭載されたセンサの扱い方を学びます。
第7回の目標
スマートフォンには様々なセンサが搭載されており、
Flutterにはそれらを簡単に利用するライブラリが多数搭載されています。
今回の講義では、代表的なセンサの一つとして、加速度センサについて学びます。
—
モーションセンサ
市販のスマートフォンに搭載されているセンサの一つに「モーションセンサ」があります。 モーションセンサを用いることで、スマートフォンの振動や角度を取得できます。
例えば、加速度センサは以下の機能を実現するために使われています。
- スマートフォンを振って直前の操作を取り消す
- スマートフォンの角度に応じて画面を回転させる
- 画面上のボールを中央に留めるゲーム

今回は、デバイス加速度センサを使って、画面の色を変更するアプリを作ります。
- X軸方向に振る → 青色
- Y軸方向に振る → 赤色
- Z軸方向に振る → 緑色
モーションセンサのライブラリをインストール
モーションセンサを扱うために、sensorsとライブラリをFlutterチームが公式にリリースしています。
ライブラリの詳細はこちらのリンクから確認できます。
sensorsでは、”加速度センサ”の他に”ジャイロセンサ”と”デバイス加速度(加速度センサから重力加速度を抜いたモノ)”も使うことができます。
では前回と同様にpubsepc.yamlのdependences:以下にsensors: ^2.0.3を追加してください。
dependencies:
  sensors: ^2.0.3
各センサは、以下のコードを使うことで、センサの値が更新される度にlisten内の関数が呼ばれます。
import 'package:sensors/sensors.dart';

accelerometerEvents.listen((AccelerometerEvent event) {
  print(event);
});
// [AccelerometerEvent (x: 0.0, y: 9.8, z: 0.0)]

userAccelerometerEvents.listen((UserAccelerometerEvent event) {
  print(event);
});
// [UserAccelerometerEvent (x: 0.0, y: 0.0, z: 0.0)]

gyroscopeEvents.listen((GyroscopeEvent event) {
  print(event);
});
// [GyroscopeEvent (x: 0.0, y: 0.0, z: 0.0)]
サンプルアプリの実装
サンプルアプリを実装していきます。モーションセンサを扱うためには、スマートフォンの実機が必要です。 必ず実機にアプリをインストールして試してみてください。
最終的にアプリはこのように動作します。
⓪ まず、sensorsライブラリをインポートします。
① 次にinitState:にてセンサイベントのモニタリングを開始します。
② 取得したセンサデータの生データを可視化します。UserAccelerometerには、X軸・Y軸・Z軸方向のUserAccelerometerの値が保存されています。
③ ラベルと背景色を取得したセンサデータの値に応じて変更します。 今回の例では、UserAccelerometerの各軸絶対値が15より大きくなった場合に、イベントを発生させています。
  var color = Colors.white;

  userAccelerometerEvents.listen((UserAccelerometer event) {
    setState(() {
      if (event.x.abs() > 15) {        // <-- X軸方向へのスイング
        color = Colors.blueAccent;
      } else if (event.y.abs() > 15) { // <-- Y軸報告へのスイング
        color = Colors.redAccent;
      } else if (event.z.abs() > 15) { // <-- Z軸方向へのスイング
        color = Colors.greenAccent;
      }
    });
  });
最終的なソースコードはこちらから確認できます。
モーションセンサの応用
これまで実装したTODOアプリにモーションセンサの組み込んでみましょう。
例えば、
- 「Z軸方向にスイングした時に、TODOの入力用ポップアップを表示」
- 「特定パターンで振った時だけ、TODOリストが表示されるロック機能」 などが実現できます。
位置情報センサ
スマートフォン搭載された位置情報センサを用いて、位置情報を取得してみましょう。 位置情報を扱うライブラリは、こちらのリンクから確認できます。
位置情報ライブラリをインストール
pubspec.yamlにlocation: ^4.2.0を追加
dependencies:
  location: ^4.2.0
- 各OSの権限を修正
- Android
AndroidManifest.xmlを開いて、<users-permission .... />を追加する。 場所は、<project root>/android/app/src/main/AndroidManifest.xmlです。
- Android
<manifest xmlns:android="http://schemas.android.com/apk/res/android"
    package="com.example.my_todo">

    <!-- 以下のuser-permissionを追加 -->
    <uses-permission android:name="android.permission.FOREGROUND_SERVICE" />
    <uses-permission android:name="android.permission.ACCESS_BACKGROUND_LOCATION"/>
    <!-- ここまで -->

   <application
        android:label="my_todo"
        android:icon="@mipmap/ic_launcher">

        ...
        ...
        ...

   </application>
</manifest>
- iOS
iOSの設定ファイル(
Info.plist)を修正します。ios/Runner.xcworkspaceを開いて、Runner → Infoを選択し、Custom iOS Target Propertiesに以下のKeyを追加し、Valueにその説明を記述する。
// This is probably the only one you need. Background location is supported
// by this -- the caveat is that a blue badge is shown in the status bar
// when the app is using location service while in the background.
NSLocationWhenInUseUsageDescription

// Deprecated, use NSLocationAlwaysAndWhenInUseUsageDescription instead.
NSLocationAlwaysUsageDescription

// Use this very carefully. This key is required only if your iOS app
// uses APIs that access the user’s location information at all times,
// even if the app isn't running.
NSLocationAlwaysAndWhenInUseUsageDescription
Xcode上でのInfoタブの位置はこちらです。
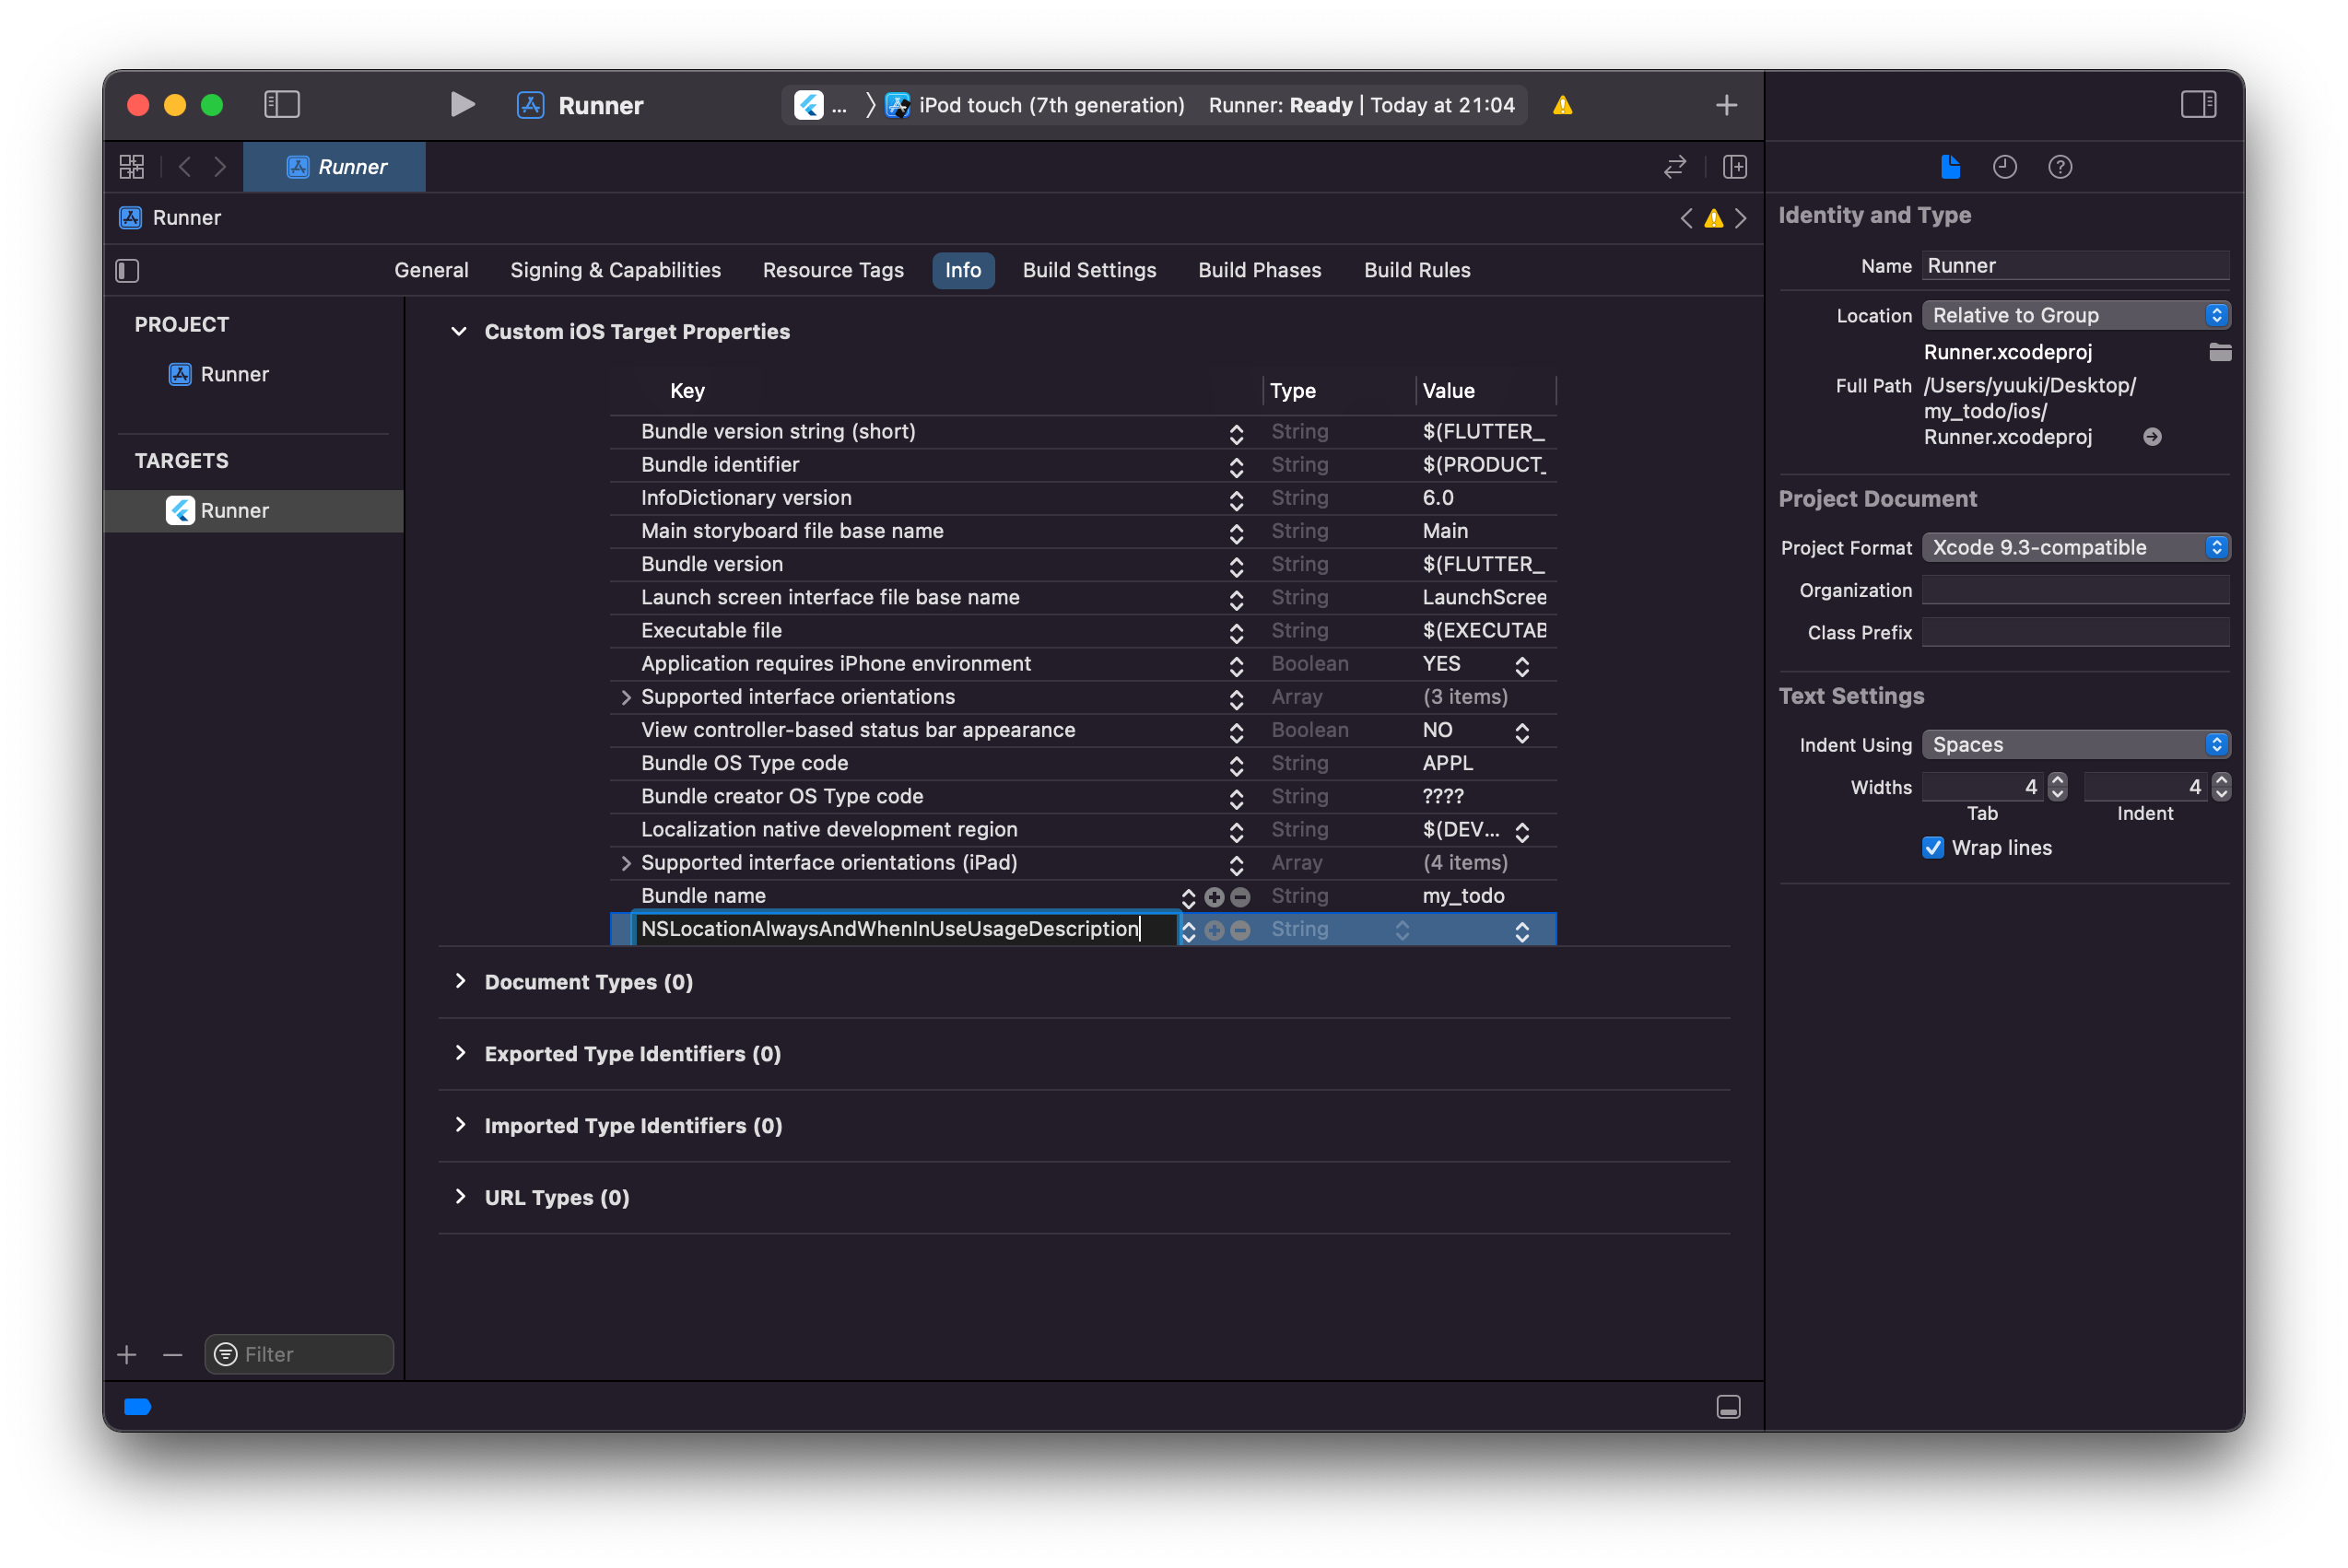
Key-Valueを設定する位置を拡大します。Keyには、NSLocationWhenInUseUsageDescriptionまたは、
NSLocationAlwaysUsageDescription、NSLocationAlwaysAndWhenInUseUsageDescription
を記述します。説明文は、任意の文章を記入してください。

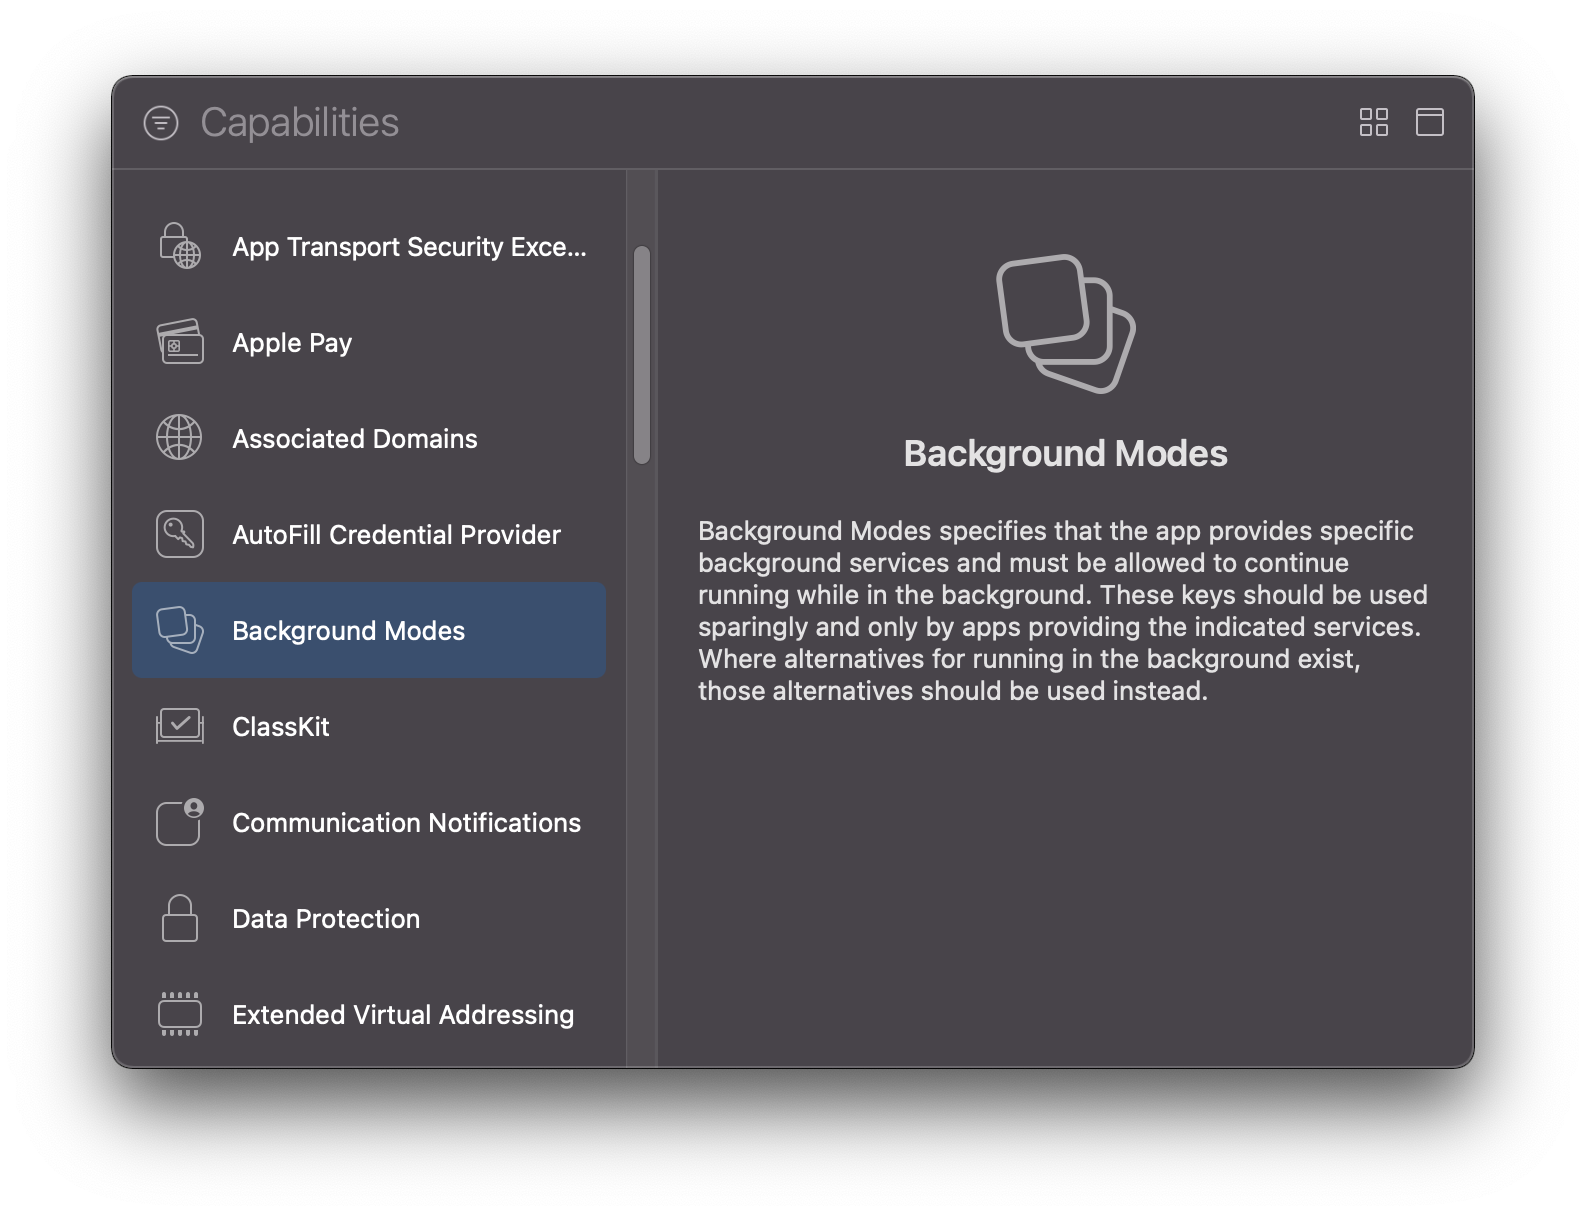
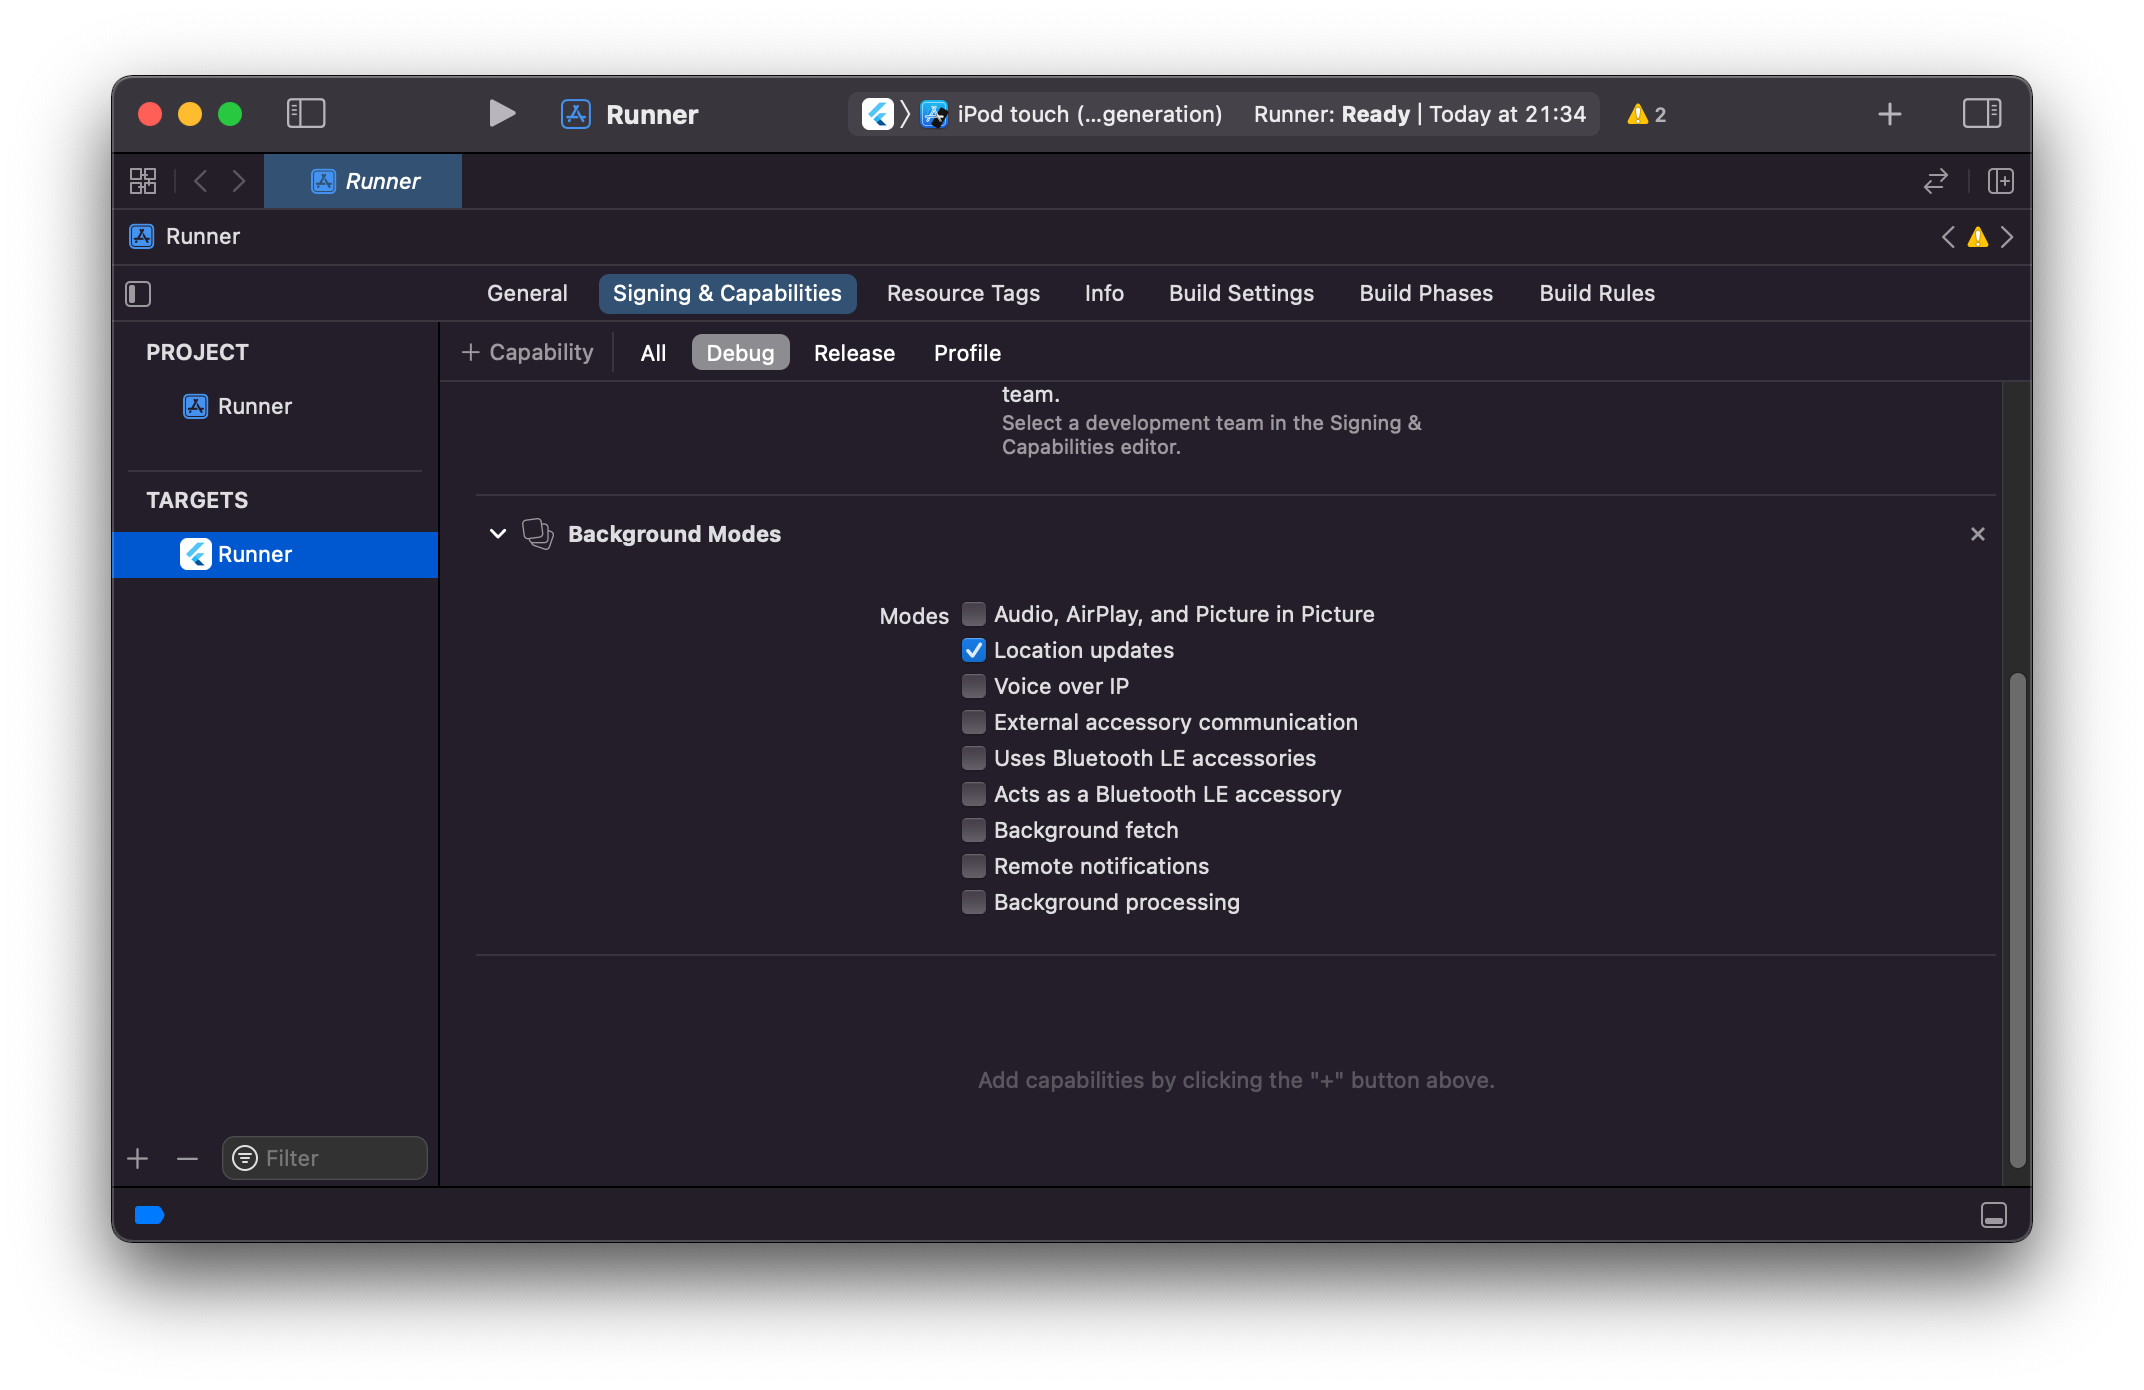
- 【オプション】【注意】アプリがバックグランド状態でも位置情報を記録する必要がある場合のみ 以下の設定を行なってください。
Signing & Capabilitiesを開き、+ CapabilityをクリックBackground ModesをクリックLocation updatesにチェックマーク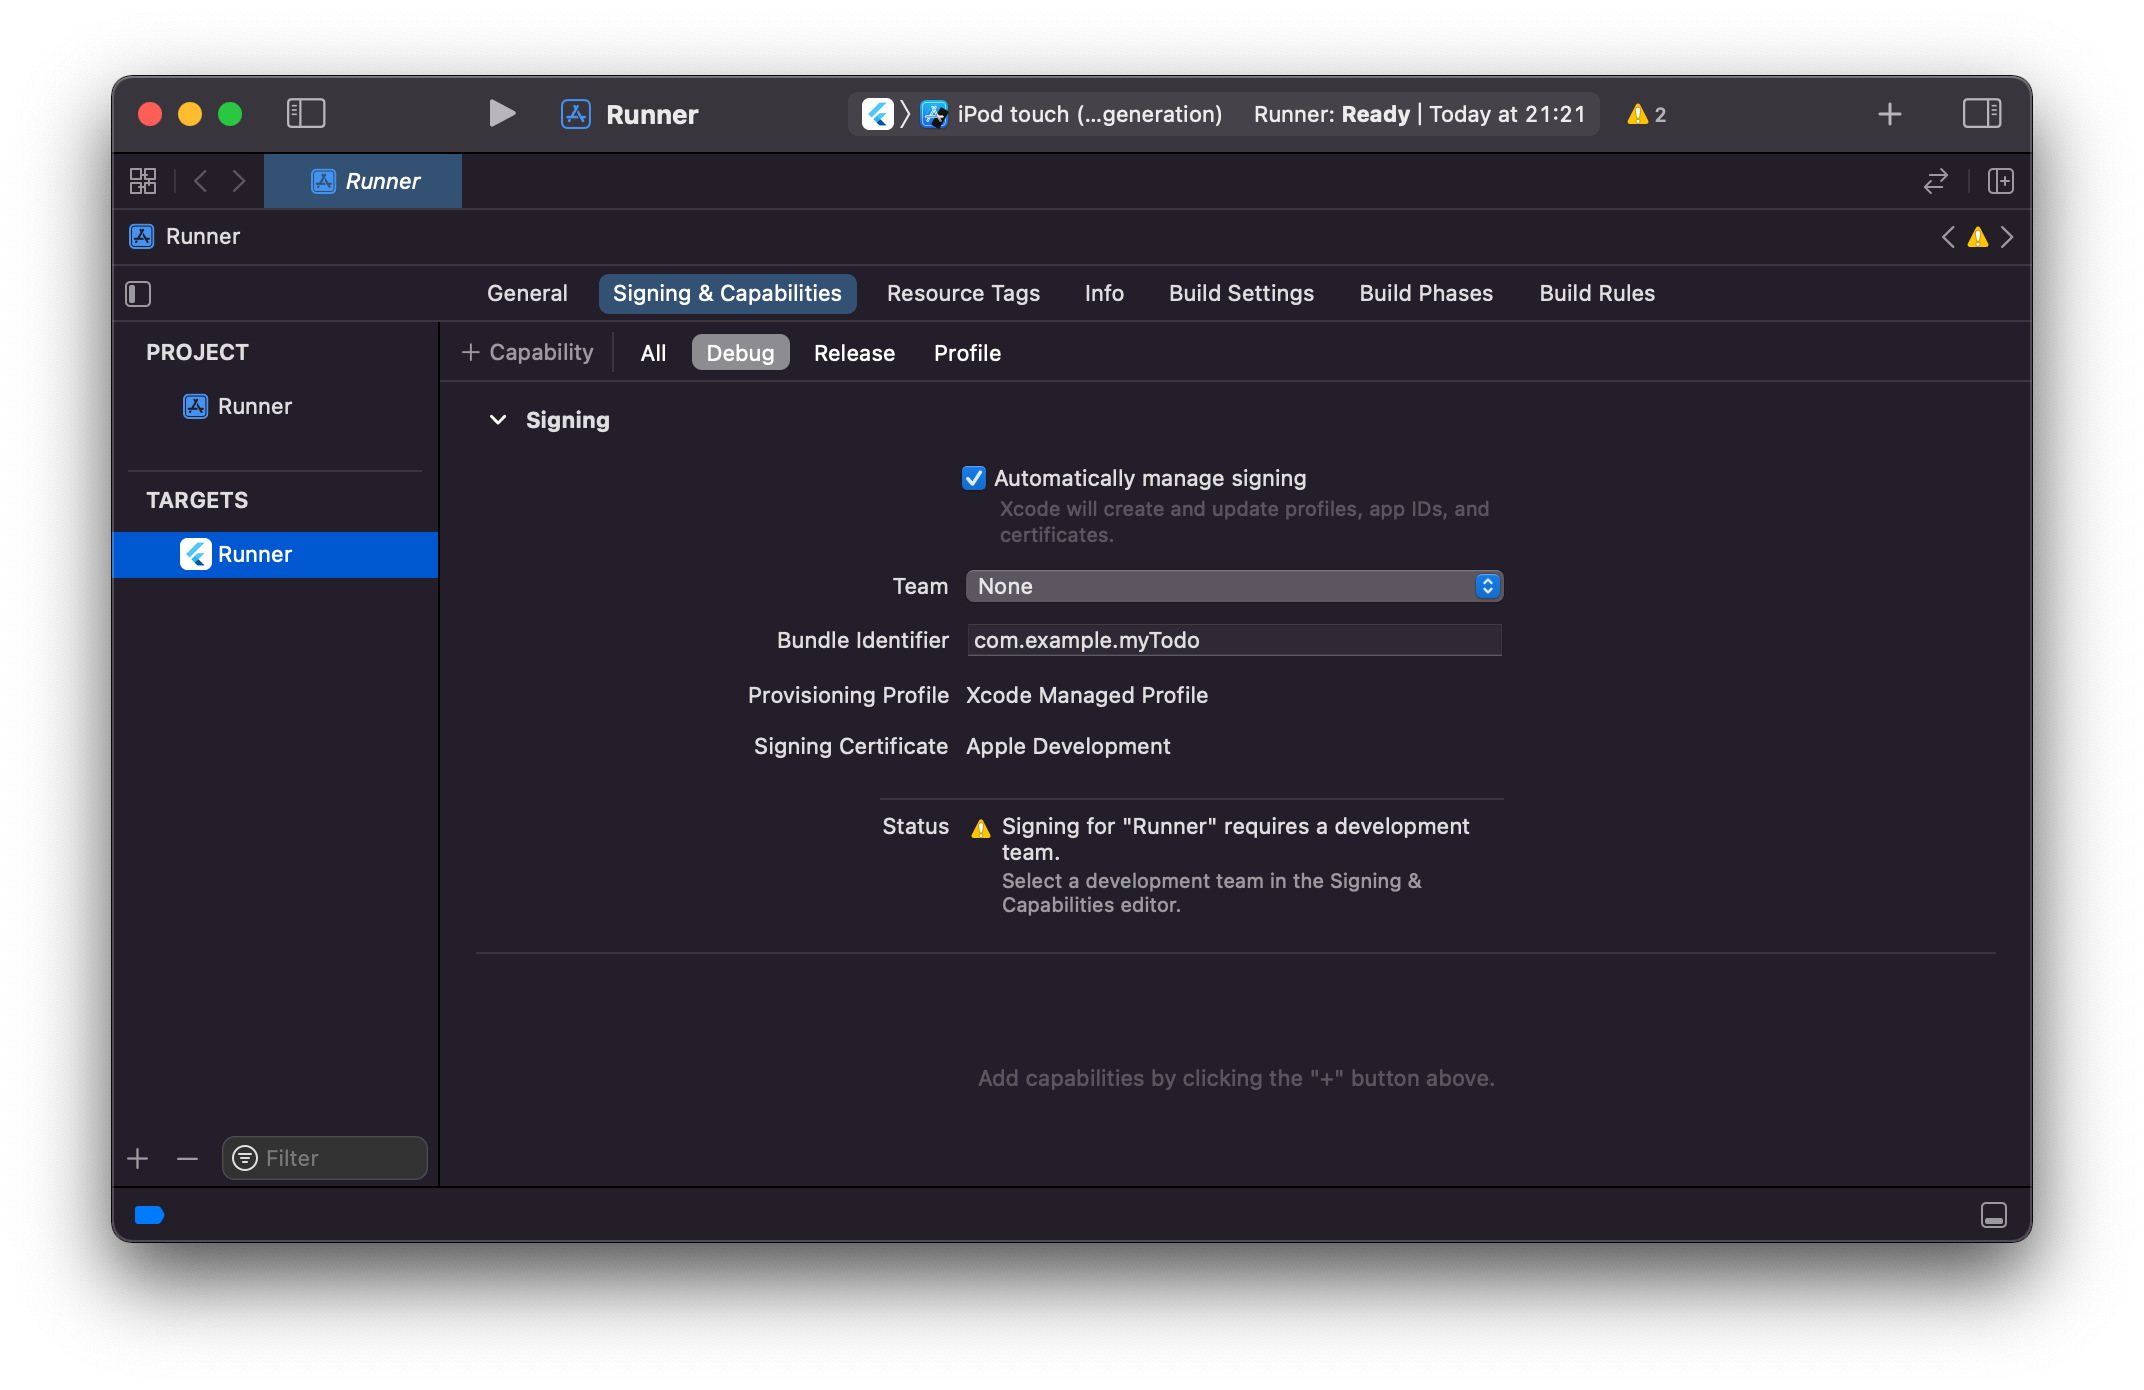
位置情報ライブラリの利用方法
locationライブラリをインポートします。import 'package:location/location.dart'-
位置情報利用の許可をユーザから得る
Location location = new Location(); bool _serviceEnabled; PermissionStatus _permissionGranted; LocationData _locationData; _serviceEnabled = await location.serviceEnabled(); if (!_serviceEnabled) { _serviceEnabled = await location.requestService(); if (!_serviceEnabled) { return; } } _permissionGranted = await location.hasPermission(); if (_permissionGranted == PermissionStatus.denied) { _permissionGranted = await location.requestPermission(); if (_permissionGranted != PermissionStatus.granted) { return; } } -
許可された場合は、位置情報を取得する
_locationData = await location.getLocation(); -
位置情報が更新されたタイミングで継続的に位置情報を取得するには、
listenメソッドを使います。location.onLocationChanged.listen((LocationData currentLocation) { // Use current location }); - 【オプション】バックグランドでデータを収集するためには、バックグランドモードをオンにします。
location.enableBackgroundMode(enable: true)
位置情報センサで取得できる情報
位置情報センサを利用することで、以下の値を取得できます。
class LocationData {
  final double latitude; // Latitude, in degrees
  final double longitude; // Longitude, in degrees
  final double accuracy; // Estimated horizontal accuracy of this location, radial, in meters
  final double altitude; // In meters above the WGS 84 reference ellipsoid
  final double speed; // In meters/second
  final double speedAccuracy; // In meters/second, always 0 on iOS
  final double heading; // Heading is the horizontal direction of travel of this device, in degrees
  final double time; // timestamp of the LocationData
  final bool isMock; // Is the location currently mocked
}
データを地図上に可視化
- Flutterの
pubspec.yamlにflutter_mapを追加します。
dependencies:
  flutter_map: ^0.14.0
- Androidの場合は、
<project root>/android/app/src/main/AndroidManifest.xmlに以下の設定を追加します。
<uses-permission android:name="android.permission.INTERNET"/>
- マップWidgetを生成し、
latitudeとlongitudeをMakerのパラメーターに追加する
import 'package:flutter_map/flutter_map.dart';
import 'package:latlong2/latlong.dart';


Widget build(BuildContext context) {
  return FlutterMap(
    options: MapOptions(
      center: LatLng(51.5, -0.09),
      zoom: 13.0,
    ),
    layers: [
      TileLayerOptions(
        urlTemplate: "https://{s}.tile.openstreetmap.org/{z}/{x}/{y}.png",
        subdomains: ['a', 'b', 'c'],
        attributionBuilder: (_) {
          return Text("© OpenStreetMap contributors");
        },
      ),
      MarkerLayerOptions(
        markers: [
          Marker(
            width: 80.0,
            height: 80.0,
            point: LatLng(51.5, -0.09),
            builder: (ctx) =>
            Container(
              child: FlutterLogo(),
            ),
          ),
        ],
      ),
    ],
  );
}
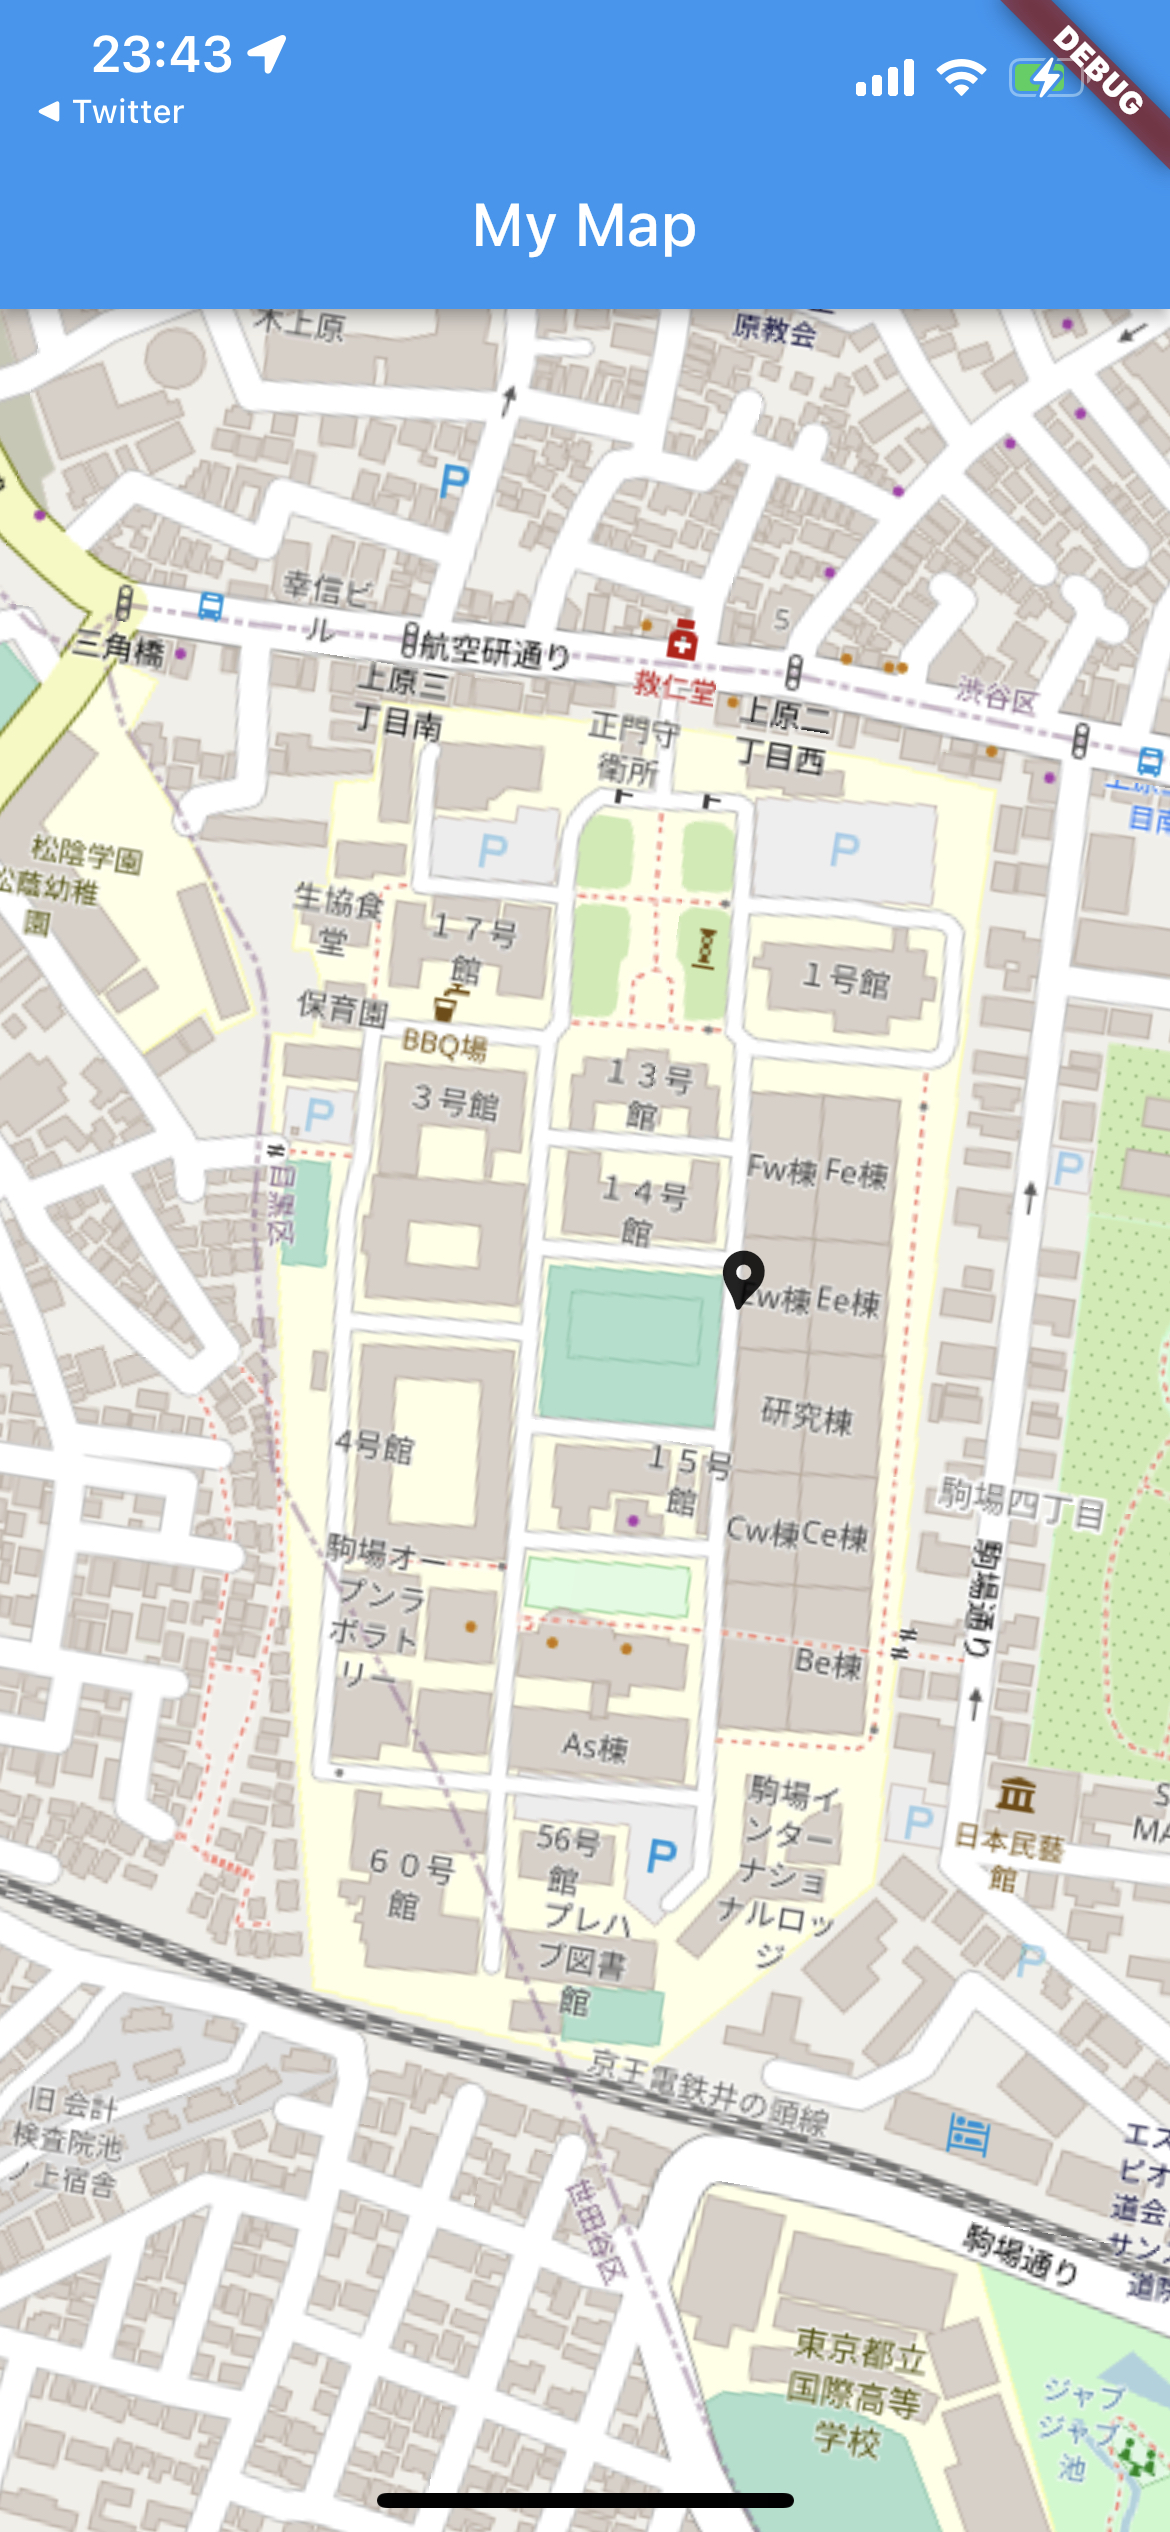
「位置情報の収集」と「地図上への可視化」を組み合わせると、下記のようなコードになります。
トラブル対応
iOS端末にインストール時に、以下のエラーが発生することがあります。
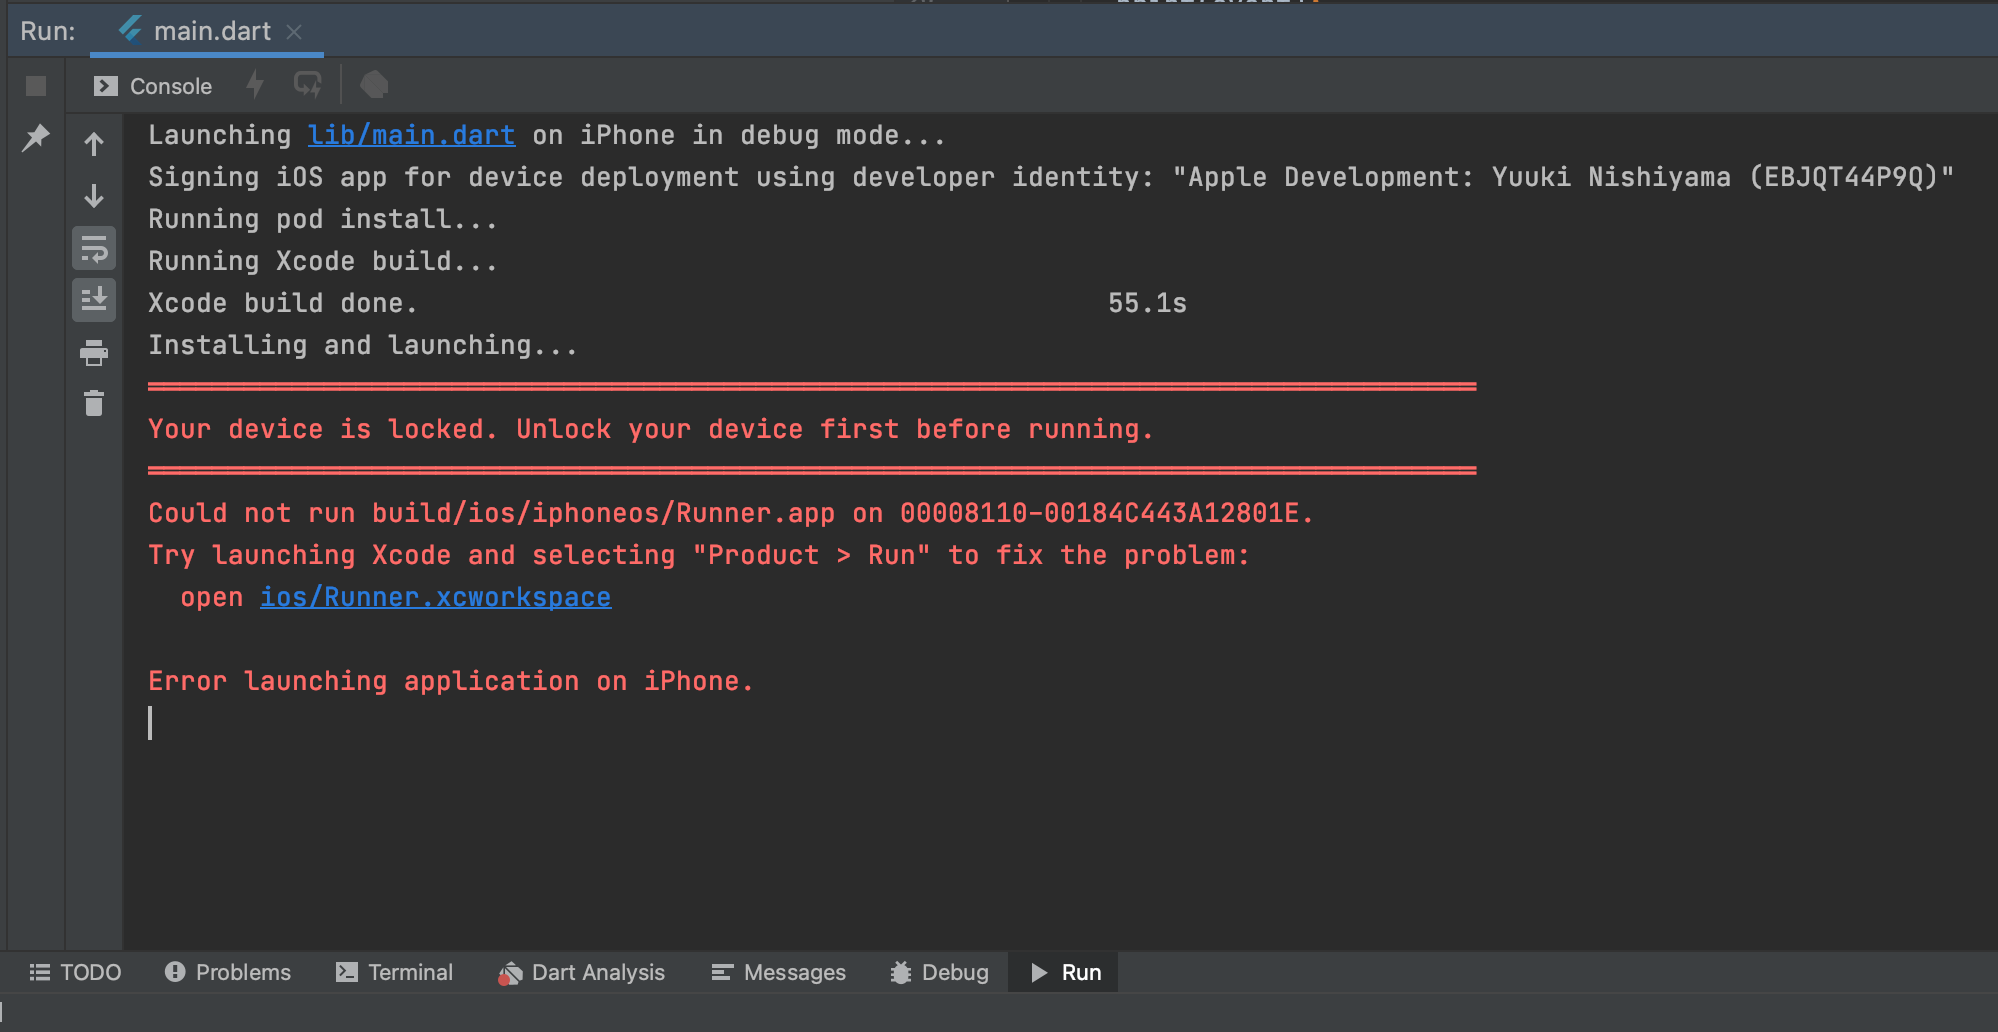
この場合、iOSアプリへの書き込み権限・設定関係でエラーが発生しているので、 iOSの設定ファイルから変更を行う必要があります。
-
iOSの設定ファイルを開くためには、Android Studio上の表示されているFlutterのファイル一覧から、 「
iosを右クリック → Flutter → Open iOS module in Xcode」を選択し、Xcodeを起動する。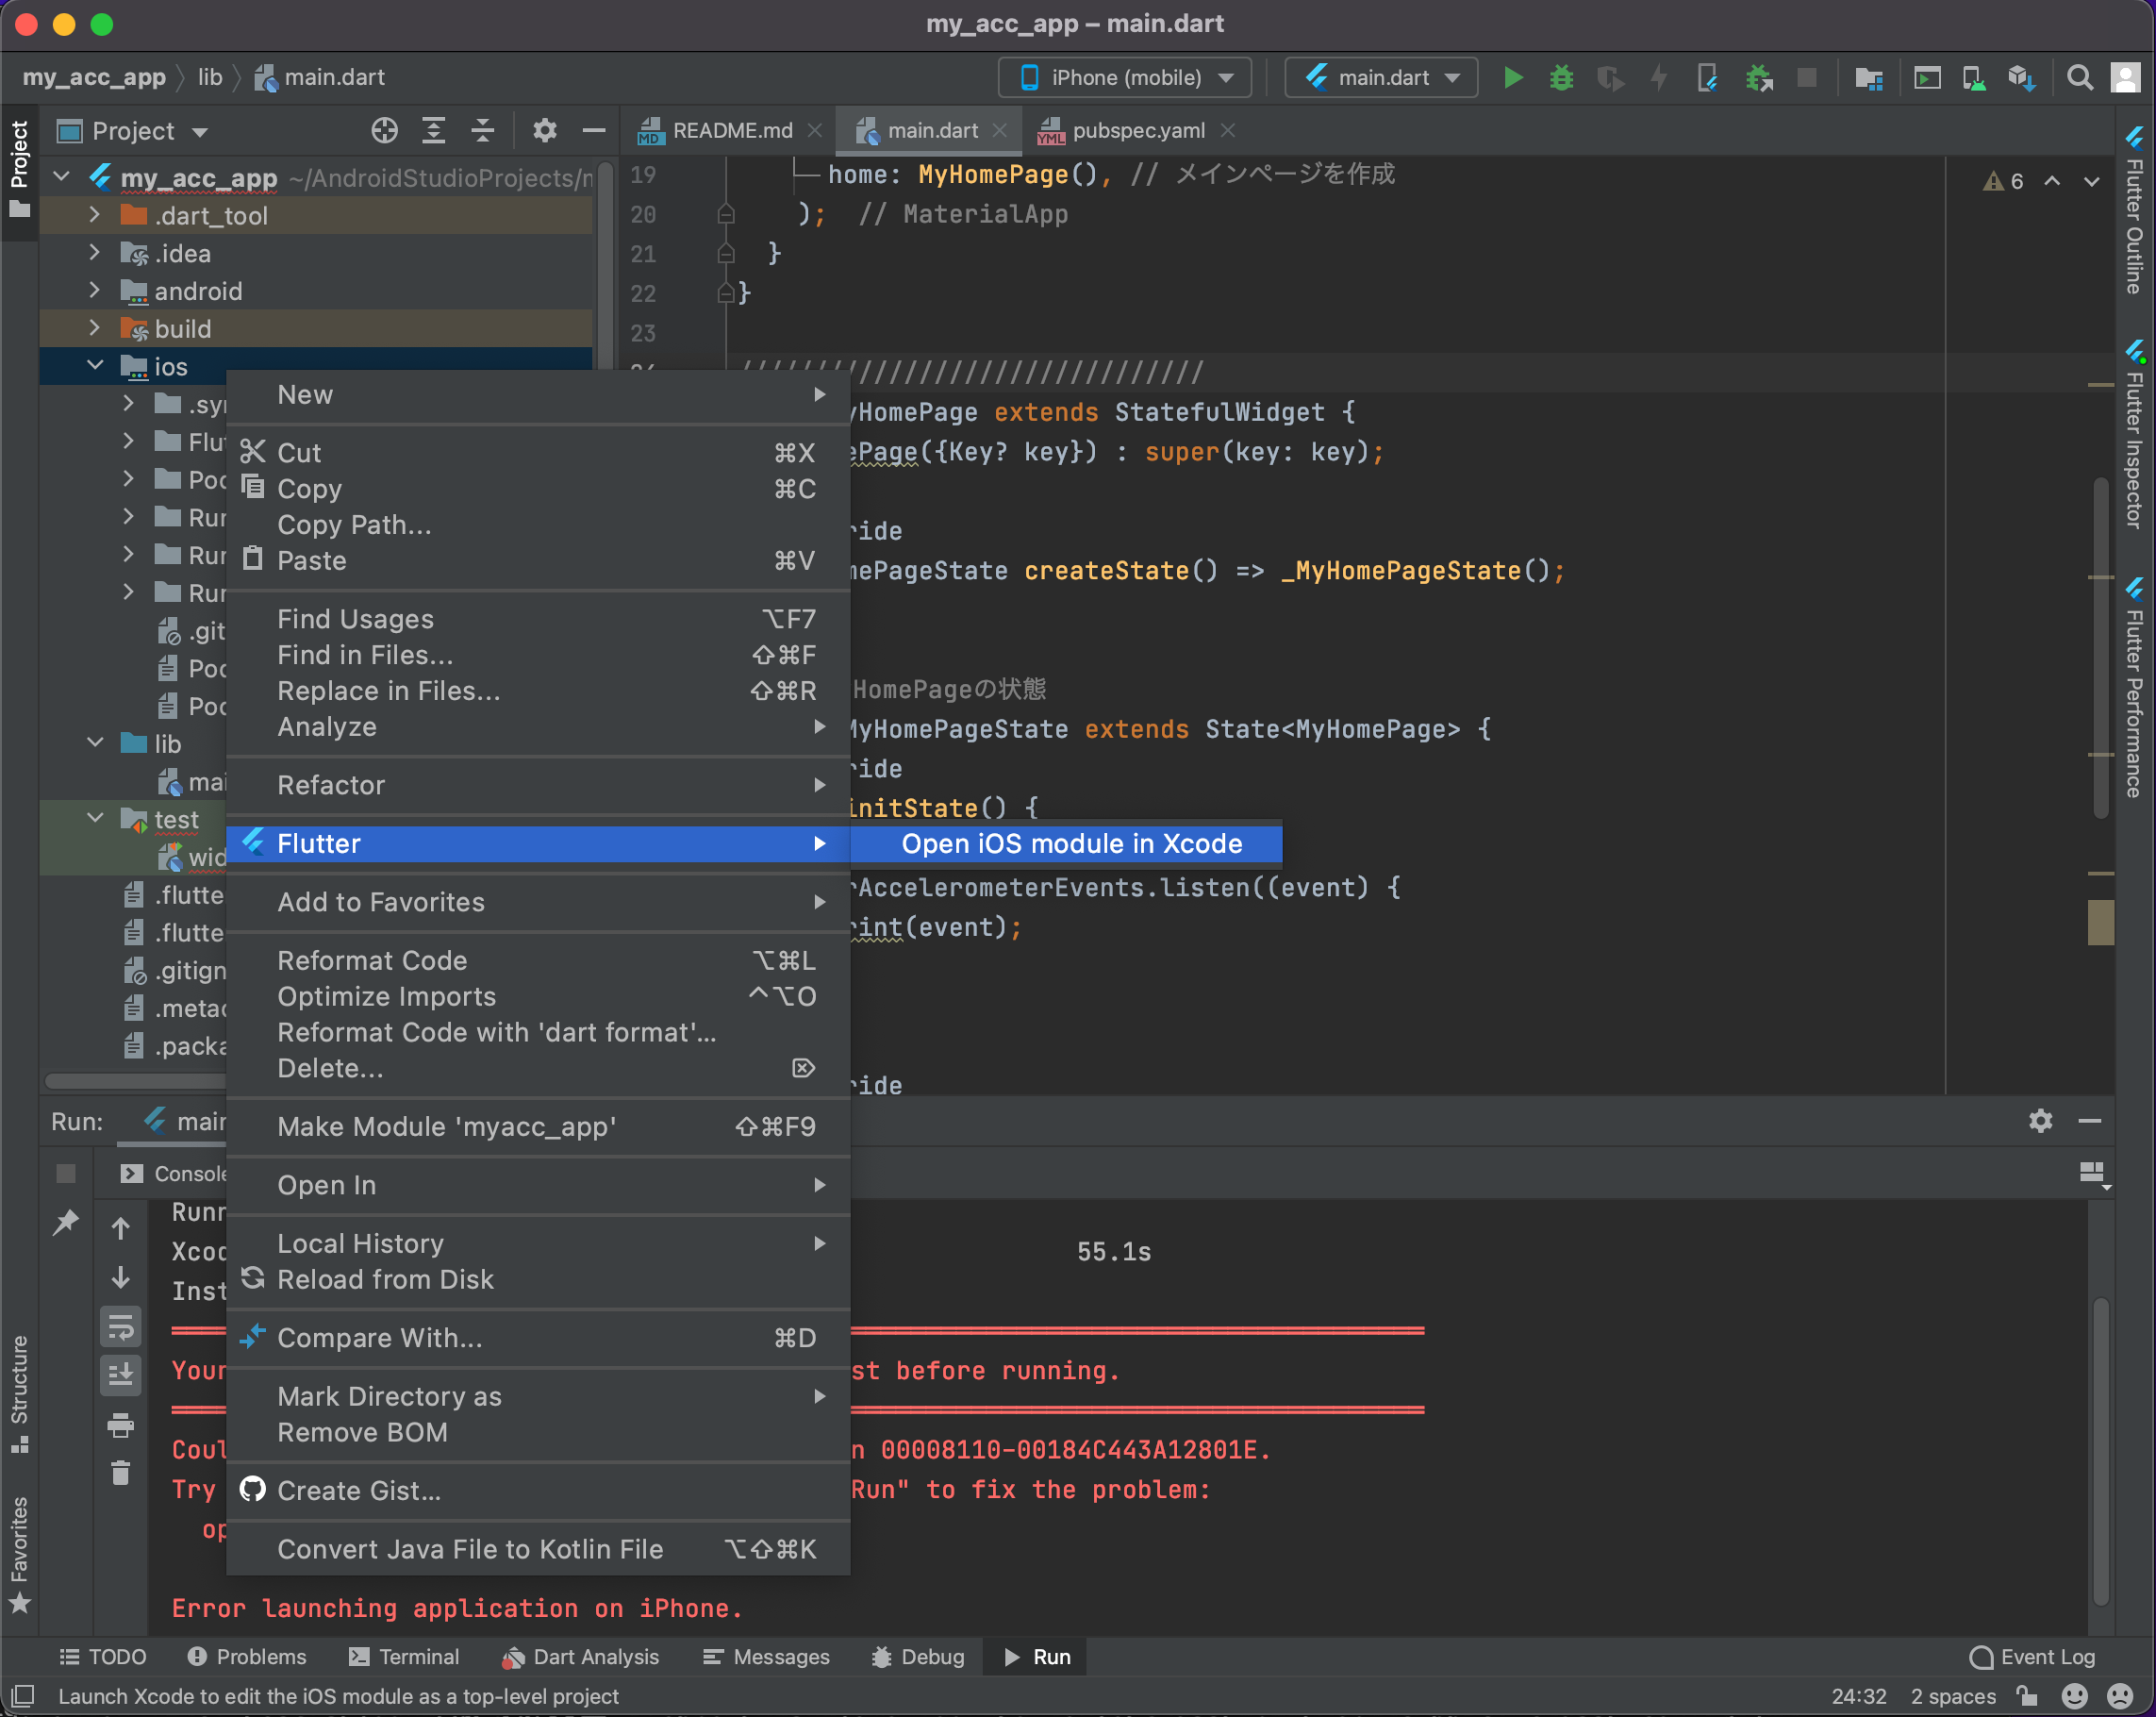
-
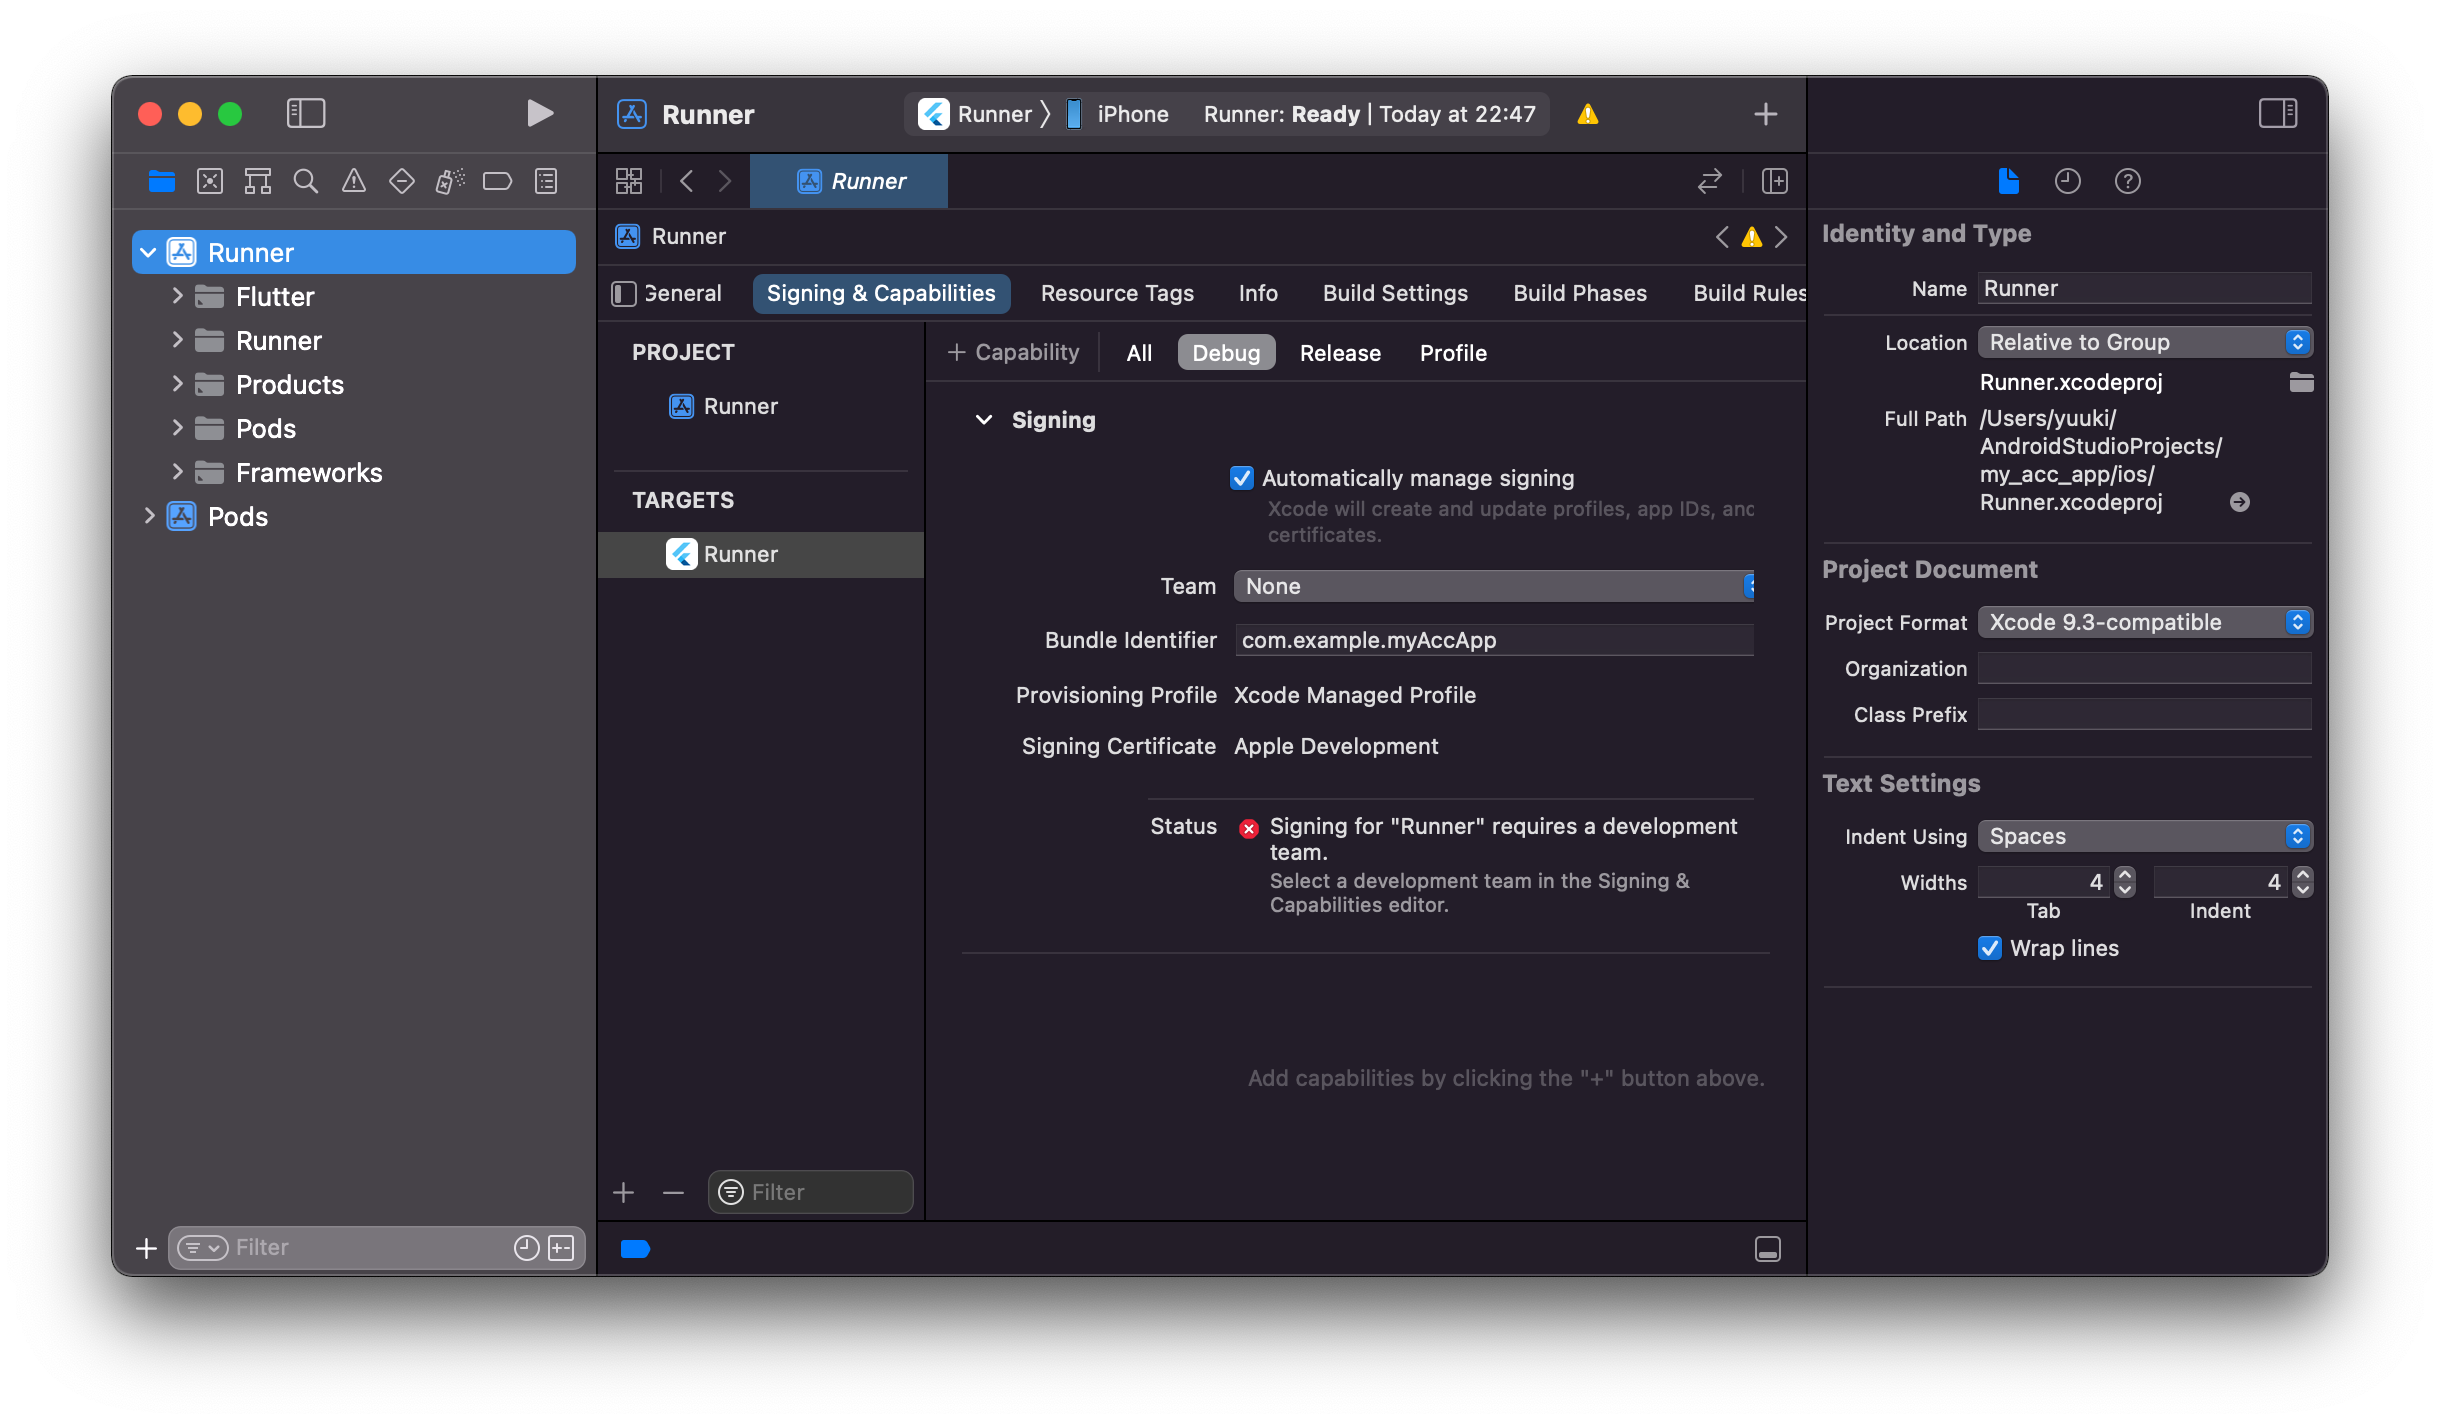
次に「Runner → Signing & Capabilities → Signing」に移動し、表示されているエラーを解消する。
-
問題を解決したら、Android Studioに戻って再度プロジェクトを実行する。
